Getting Inky In Class

Wednesdays are one of my favourite days of the week! Not only is it hump day which means that the weekend isn’t too far away, but it is also Craft & Coffee day! Where my lovely group of ladies, whom quickly became friends, come over for a crafting session for a few hours in the morning. We chat, drink hot drinks, laugh and most importantly (and fun), we create. I usually like to showcase a new technique, feature a fancy fold card or a new stamp set or create a 3D item at these Wednesday sessions although I am slowly but surely running out of fun ideas to use.

Not this week, thanks to my super talented friend and fellow Stampin’ Up! team member Jess over at The Paper Caper. Jess recently featured an inky card over on her blog and I knew that I just had to get myself and my ladies inky also and create our own versions of Jess’ awesome card!!!


Now, I did warn my ladies before the class that they would get inky, and inky they did get. Hands, fingers, and I even managed to drip some Pumpkin Pie on my jeans. And it was lots of fun. Watching them all have a blast creating with water, sponges and re-inkers. It was almost like being in Kindergarten again. Sploshing and splotching on paper to create a beautiful masterpiece.


With this technique, I love how each and every single person’s card came out differently. Even though we all used the same technique and the same colours etc., the inky sponges did whatever they wanted and created some beautiful, artistic patterns.

It’s been a long time since I was in Kindergarten, and this brought back some wonderful memories, so I think I will definitely be getting messy again (maybe not with Blackberry Bliss as my nails are still stained two days later LOL) but am definitely going to try some new, fun things in my creations. Thanks Jess for getting me back to basics!

Happy stamping,
From your favourite Vintage Graffiti artist,
Emma xo

Product List

Artistic Expression With CASE-ing The Catty

WOW! What a great section that we’ve got to work with over at CASE-ing The Catty this week! Artistic Expression. This category goes for a whopping 24 pages. With so much to choose from, picking what to CASE this week was a bit tricky.

after much page flicking and procrastination, I decided to CASE the cute little box on page 133, but turn it into a super cute card instead. How can you resist the black and white stripes?

Annual15_p133_a

At the moment, I actually have just realised that I have run out of Kraft cardstock (terrible, I know) so the base had to be my ever faithful Crumb Cake. Don’t you just love how Crumb Cake automatically matches with everything? All the colour groups. It is just so adaptable. I also didn’t have any stripy paper on hand to suit, and I definitely wanted to use stripes as that is what drew me towards the box in the first place. Then I remembered that I saw a stripy card in my Moments Like These Project Life Card Collection. Winning. It’s a great card with a water colour effect to it which is so on trend at the moment. And it was perfect for my CASE!


I can’t wait to see what the rest of the CASE-ing The Catty crew have been up to with the Artistic Expression part of the catalogue. Now, head on over and checkout the amazing Jessica Williams to show you more fabulous artistic ideas.

IMG_1506

Happy stamping,
From your favourite Vintage Graffiti artist,
Emma xo

Product List

Something Different For Little Levi

When I get asked to create a card for a newborn baby, my go to colours are usually Crumb Cake, Whisper White and a subtle blue or pink maybe with a bit of gold or silver thrown in for good measure. This time, I wanted to make something a little different. Something a little bit fun and funky, just like this new little guys name, Levi!

I was instantly drawn to a denim colour as it seemed to fit. Lost Lagoon was what caught my eye… Now to piece the rest together. My original idea was to use the very versatile Layered Letters Alphabet stamp set and stamp the name in Lost Lagoon and then to create my own background paper by stamping his name over and over in a subtle colour until the whole piece of Whisper White was covered. As soon as I started stamping the Smoky Slate, I knew this idea absolutely wasn’t going to work… Can you see why?

I don’t think little Levi’s Mum and Dad would appreciate a card with vile, evil Levi stamped all over it. But I did get a little giggle from it. So, in the scrap heap this idea went and back to the drawing board.

Here is what I came up with… What do you think? Suitable as a ‘welcome baby’ card? I think so. Fun and funky? Again, I think it fit the criteria. And I am loving how it turned out and all the little extra details such as the think Smoky Slate Baker’s Twine, Everyday Occasions washi tape and our cute little Stampin’ Up! staples.

Eek, have I also mentioned my new favourite product at the moment?! Oh my, if not, it’s the Rotary Alphabet stamp and I’m addicted. Yes, I’m a bit late to hop on the bandwagon as it was in last year’s Annual Catalogue but I have only just discovered it’s awesomeness. I have been using it on almost all my cards lately and can’t see me stopping anytime soon. Perfect for when you need a specific greeting or saying to personalise your creation and you don’t have anything suitable on hand! Fab-u-lous!

Happy stamping,
From your favourite Vintage Graffiti Artist,
Emma xo

Product List

Christmas Already With CASEing The Catty

It’s still only July and this is my second Christmas card post. I can’t believe it.

This time, we are venturing into the realm of all things Christmasy with CASE-ing The Catty this week. With only having two current Christmas stamp sets, I knew it was going to be a little bit tricky.

Annual15_p067

The card that stood out to me for this project was on the front cover of the Christmas section. Of course, it features Typeset DSP. How could I not choose this?! It’s the bottom, left card, pictured above. I did not have the ‘Every Blessing’ stamp set so I improvised with the very cute and very versatile ‘Festive Of Trees’ photopolymer stamp set instead. Last year, this was my go to set for everything from Christmas tags, to cards, to decorations and everything else in between. I have also already run a Christmas in July tag class this year with it. It is very clean and simple set to use and with a co-ordinating punch, it makes life and paper crafting easy!   

To make sure both the trees on the card stood out from one another, once I stamped the first tree image, I did no re-ink the image before stamping again. This gave me a more opaque image to work with. And when stamping the little bird over the top, because the image was a but translucent, it made that little guy stand out and be noticed.


 The addition of the ‘Gold Glimmer Paper’ and the pop of the Crushed Curry star image finishes of the card nicely. I think this would also look great with Cherry Cobbler or Old Olive being used as the base of the card for a bit more colour if you are not into the monotones.

Loving the idea of stamping over Designer Series Paper in the Memento Black, the possibilities are endless!

Next on your journey is the fantabulous Julia Quinn with her gorgeous Christmas Creation. Be sure to go over and visit!

IMG_1506

Happy stamping,

From your favourite Vintage Graffiti Artist,
Emma xo

Product List

Project Life by Stampin’ Up! with CASE-ing The Catty

As written in the Stampin’ Up! Annual Catalogue on page 49: Project Life is a simple system for organising your photos into albums. A few basic products are all you need to get started so you can spend more time living and less on memory-keeping.

  
I’m so grateful that over at CASE-ing The Catty this week that we are delving into the world of Project Life! It is a chance for me to have a play with my new ‘Moments Like These’ bundle


I love that in our catalogue, Stampin’ Up! have grouped together selected matching products and has offered you a saving of 15% when purchased all together. How good is that?! I love a bargain. Especially when it’s on fabulous crafty products. With this specific bundle, you receive a whole heap of co-ordinating Project Life products consisting of the ‘Project Life Moments Like These’ photopolymer stamp set, a card collection and an accessory pack. Almost everything you need to get started on your Project Life, memory-keeping journey. The addition of the gold foil specialty cards combined with the wood elements in the pack had me swoon. Right up my alley!

 
For my CASEing The Catty project this week, I wanted to share that the elements in the PL packs do not have to specifically be used for Project Life projects. You can use them for card making and gift packaging and more! So, so versatile.


I was inspired to CASE the Project Life page in the top left hand corner of the catty! I love the sentiment on the card and especially the sequins. I do love a bit of bling!


I have had my sewing machine sitting stagnant on my desk in my craft room for quite awhile now. ‘Betsy’, as I have lovingly named her had been gathering dust and was screaming out to be turned on and used. Although, I don’t think sewing paper is quite what Betsy had in mind when I took her dust cover off and plugged her in! But, what a great way to adhere the sequins in the accessory pack to my card! A window sheet and some patience (as my sewing is rusty and the sheets are slippery) and what a gorgeous effect that’s been added to my card.


My mojo was telling me that recreating one card for this post was not enough. My creativity was flowing and I had fallen in love with the teeny 2″x2″ cards in the PL Accessory Pack. I knew they would be the perfect accompaniment to an Gift Bag Punch Board bag! And, I was right! A-dor-able. Some sequins, teeny tiny sewing by Betsy and some glue – finished. It was that easy.


Here is a photo of the two projects together. Who doesn’t love a matching pair?! I know I do!

The Paper and Stamp Addict, Rebecca Scurr next in the hop. She also has some magical Project Life ideas to share with you, so why not go past and check them out?!


Happy stamping,

From your favourite Vintage Graffiti Artist, 

Emma xo


Wondrous Christmas In (Almost) July

Wow, 6 months of 2015 has passed already. Flown by. It only feels like yesterday when we were all doing the last minute mad dash to prepare ourselves for Christmas! But, are we ever prepared? I never feel like what I have done is enough or finalised until Christmas day has gone off without a glitch and everybody is happy. Am I the only one who feels like this?

Well, this week I was inspired by the amazing sketch created by Narelle over at the Just Add Ink Challenge Blog.

 I was instantly drawn to this sketch. Especially the circle element. So, I looked up at my current stamps and waited to be inspired. Our Wondrous Wreath photopolymer two-step stamping stamp set jumped right out at me. Was it to early to start creating Christmas cards? Shall I try and use the set to create something ‘not Christmasy’?! Nahhhhh, lets go with the flow and see where it leads us…

And I must say, I love where my mojo took me! The neutral colour palette with a ‘pop’ of Cherry Cobbler and gold for fun and how fabulous do these colours all go together? I know what colour scheme I will be using on most of my Christmas cards this year!

With my creative juices were flowing, I just couldn’t stop. So, based on the existing card elements and what was still lying around on my desk, I also gave the inside of the card a little bit of flair, still leaving enough room to write a personal message. I also think that the way I have decorated the inside of the card would actually make a cute, quick and easy Christmas card on it’s own!


Also, just a small reminder that today is the last day to take advantage of the amazing joining offer Stampin’ Up! has running at the moment and to become part of my amazing team and get two extra FREE stamp sets in the process! How good is that?

You can find out more by clicking the ‘Join Now’ button above or get straight into it by clicking here.

Happy stamping,
From your favourite Vintage Graffiti artist,
Emma xo

Product List

A Whole Lot Of Thanks with CASEing The Catty

This week it’s all about thank you cards with the CASEing The Catty Crew.

You may have come here from Monique’s blog or straight from the CASEing The Catty blog and the next very talented demonstrator on your journey is my gorgeous friend and very talented lady, Miss Rebecca, The Paper and Stamp Addict!

A thank you card is a style of card that should be sent more. Everyone loves receiving happy mail, so why not make somebody’s day and send them a card? A thank you for being my friend, my neighbour, for being there, or a thank you for just being you!

This week, I’ve decided to CASE the card in the bottom left of page 13 with a little of the bottom right thrown in for good measure. I was having great trouble picking which card to recreate for this post as they are all so beautiful.

Bottom left card on page 13 from the Stampin’ Up! Annual Catalogue and my CASE for this hop.

With my new ‘Endless Thanks’ stamp set that Stampin’ Up! has out at the moment, this a perfect opportunity to use it! With so many combinations, the ways to use it are ‘endless’. (See what I did there?!)


Again, I immediately am drawn to Mint Macron to start my card. Is there any other colour on my palette now? I think not…


I love the mini clothesline pegs for that little bit of an extra special detail. And with a combination of gold and silver pegs in the pack, you are sure to find one to suit your card.


Also, to tie in with the little silver accents of the washi tape and the peg, I added some more silver to the bottom of the card.

Just a reminder to go on over to the next beautiful blogger on your journey, Rebecca. And boy, once again, she has made something lovely for you all!

Happy stamping,
From your favourite Vintage Graffiti Artist,
Emma xo

You Warm My Heart 

Yesterday, like almost every Wednesday, between 10am and 12 noon, I hold my usual Craft & Coffee class. I love having my group of ladies over every week, sharing with them what I love. I look forward to Wednesdays every week and I try and have something a little bit fun for them to do at each class. And each class varies. We don’t have a set theme.

This week though, I wanted to do something out of the box from your standard, fold open card. This week I wanted to try “fancy folds”. I don’t often do fancy fold cards, so this was something new for me and my ladies! A pop out swing card.

  
I had seen the basis on what I wanted to achieve on the internet and then I tried Google for a tutorial. I found the fabulous Julie Davison’s blog and a tutorial on there as well. Although, this didn’t suit Australian sized cards, I adapted the tutorial, changed it all around a bit and viola, my Vintage Graffiti version made using our Sheltering Tree photopolymer stamp set and our new Lots Of Labels Framelits.


It is a little bit tricky to take a photograph of this style of card but I did my best and I hope that you can see the design. I am so happy with how it turned out. One fancy fold design that I will definitely make again, and once you have the hang of it, not to fiddly either.

A little bit of bling and some sequins in the tree, a punched out love heart, some thread and a Naturals Expressions word and the card is accessorised and finished and looks glorious. Even if I do say so myself.


There wasn’t enough time in the class to create two fancy fold card but still enough time to squeeze another project in, so continuing with the same stamp set and colour schemes, we whipped up a second, and also just as beautiful card.

Some Blushing Bride sequins and Metallic Thread for a little bit of glamour and some crochet trim for a little bit of vintage and the card is finished. I love the combination of these accents together.

Now, at the moment, here, at my home, it is gloomy, cold and pouring with rain.


This photo was taken at 2.30pm in the afternoon and the weather has gotten worse since then. So, with a cup of tea in hand, the open fire raring, and this blog post finished, I think it’s a perfect afternoon to spend crafting. Don’t you? I have prep to do for next week’s class and also for my team day on Sunday afternoon. A small get together where we will do a few Make & Takes, learn a few techniques, have a chat, do some business stuff, give away some prizes and all in all have a fun filled afternoon. Want to come along to my Team Days? Well, why not have a look at becoming part of my team? You’ll find a wealth of information here or again, if you wish to jump straight in (and why wouldn’t you? There is nothing to loose and everything to gain), you can do so here.


Happy stamping,

From your favourite Vintage Graffiti artist,

Emma xo

Product List

There’s No Bones About It, It’s Another Blog Hop!

Welcome to the Eureka Stampers New Catalogue Blog Hop!!!

In this hop each of us are going to feature some new stamps, ink pads and accessories from the new 2015-2016 Stampin’ Up! Annual Catalogue. And you are in for a treat!

You may have started your hop off at Rebecca’s blog, or come to my blog via the lovely Simone, or I may be your starting point… Either way, make sure you take the time to hop and over and see what everyone has created… The ladies are all an extremely talented bunch and I’m sure you will be overwhelmed with their creativity.

For this hop, I have decided to showcase the new dinosaur stamp set featured in the catalogue on page 43 called ‘No Bones About It’. It is a photopolymer set containing 18 separate stamps with 1,000,000 different possibilities. Hence, why I couldn’t stop at creating just one card. Matching it up with our Cherry On Top DSP stack and washi tape, these cards came together quickly, as everything just co-ordinated so easily.

With 2 sons myself and a whole bunch of nephews in my family, this was an easy purchase. Combined with getting it as a half price item (thanks to Stampin’ Rewards), I know I will get lots of use from the set. And that’s not to say that it is a set just for the boys. I have also created some very cute cards with it using Melon Mambo and some bling for the girls too! My stash of children’s cards had almost depleted entirely (which is quite easy to do) and with this set and just one evening of creating, I have stocked up once again!

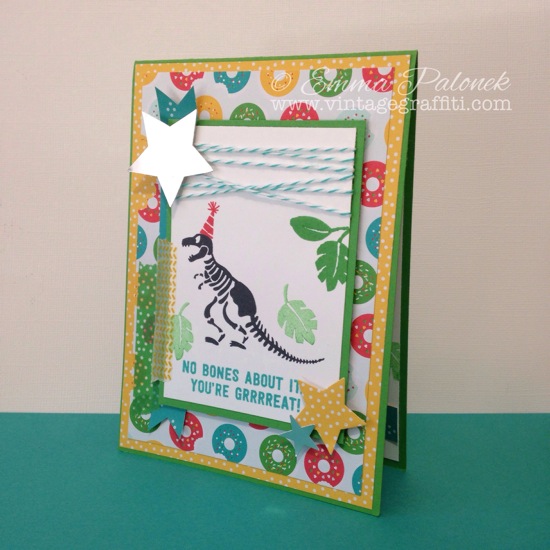
The first card I created, I just knew that I has to use the T-Rex skeleton and the ‘No bones about it, you’re grrrreat!’ greeting! I added the party hat stamp to the T-Rex’s head for a bit of fun and to suit the birthday theme of the card. Picking colours from the Cherry On Top paper, I already had a bright and cheerful card in the making. The doughnut paper from this stack is to cute for words and from first seeing it, I knew immediately that it was going to be my favourite piece. And that it needed to be added to this card. And just like some of the doughnuts on the paper that have had a bite taken out of them, (I like to think that the T-Rex did this), on the top left of the card, I used my small scallop circle punch, to take a bite out of the paper. It just adds a little bit more wow to the whole card don’t you think?!

Once again, I couldn’t resist decorating the inside of my card. I think this is going to be a regular thing as it just looks so cute and makes it all a little bit more special when the recipient opens up the card to read what’s inside and sees that you have taken the time to decorate the middle too. Using a few small elements from the front of the card and making sure that I have left enough space to write, it gets all tied together with a bit of stamping, some punchies and some washi tape.

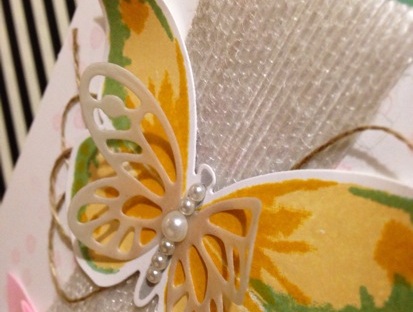
For this next card, the Expressions Natural Elements words were calling out to be used. I think that it works extremely well on this card with their earthy look and feel, don’t you think?  Not wanting to take away from the word, I didn’t add much more to this card other than some DSP, stamping and washi tape. I wanted the word ‘Celebrate’ to be the feature and the main focus and it is. These words aren’t self adhesive but are easy enough to glue down with our Tombow Liquid glue using the fine tip end. It takes a minute or two to dry but then is secure. Easy!

A close up of the Expressions Natural Elements word so you can see its texture and its earthy look and feel.

Again, I have added gone one step further and decorated the inside of the card with some simple stamping and washi tape to tie it all together. The stamped footprints across the bottom of the card are super cute!


Last but not least, I used the ‘No Bones About It’ set to CASE the catalogue. If you look at the present on the bottom right of page 5, you’ll notice that I have used that idea and created a card with the basic sketch. I couldn’t get past the cuteness of the little yellow pom poms on the present and knew that I had to use them on a card. The Cherry On Top Cotton Paper were used to create these. It is delicate yet strong and pliable and perfect for creating all sorts of things from pom poms to scrunchy flowers and more. You are only limited by your imagination.

I hope you have enjoyed looking at my creations and I’m sure there will be some more dinosaur-y ideas in the future, so keep you eyes peeled on my blog. Maybe you’d like to even subscribe so you don’t miss a thing?!

The next lovely lady on your journey is our very own Carly Middleton and her creations are sure to WOW! You can skip on over to her page by clicking here or on the arrow below.

Click the arrow picture and it will take you to visit Carly’s blog, who is the next person on your blog hop journey!

And also, here is a list of ALL the creative and crafty Eureka Stampers in the hop in case you get lost along the way, it is easy enough for you to get back on track again!

1.  Rebecca Scurr – The Paper and Stamp Addict

2. Jessica Williams – The Paper Caper

3. Simone Bartrum

4. Emma Palonek <— This is me 🙂 You are here!

5. Carly Middleton

6. Linda Whalley

7. Mel Pagano

8. Rose Packer – Creative Roses Stamping

9.  Tracy Penn

10. Tricia Raineri – The Speckled Sparrow

11. Janine Rawlins – Stamp With Janine

Once again, thank you for taking the time to look at my blog. I truly love showing you all my creations.
Happy stamping,
From your favourite Vintage Graffiti Artist,
Emma xo

Product List

Anything Goes With CASE-ing The Catty

Helllllooooo everybody!!!

It’s been a crazy week here at Vintage Graffiti HQ with a Catalogue Launch Kitchen Tea to celebrate the release of our new 2015/2016 Annual Stampin’ Up! catalogue and also the ‘release day’ of the fabulous new 2015/2016 Stampin’ Up! Annual Catalogue on June 2nd. Finally, it’s here!

There has been quite a bit of fuss and excitement over this new release (as there always is)  and to celebrate it’s arrival, the CASE-ing The Catty Crew have been asked to feature anything from the catalogue that caught our eye when they first flicked through the catalogue!!!

You may have come here from the inspiring Jackie Noble’s blog or started from here, at my blog. Either way, enjoy your journey via the CTC Crew’s blog posts!

This week we are celebrating anything that caught our eye when we first saw the new Annual Catalogue. Flipping through it’s glorious 189 pages, my first choice had to be the beautiful ‘Watercolour Wings’ photopolymer stamp set and matching ‘Bold Butterfly’ Framelits on page 75! How can you go past these big, bold and beautiful butterflies combined with all things “in” at the moment which is definitely watercolour?! You just can’t! (And, seriously, how cute is that small butterfly Framelit!)

The gold twine and the cute little staple combined with the subtlety of the vellum and the bold colours of the butterfly really make this card special. Don’t you think?

My inspiration was to CASE the simple and lovely card at the top left of the page. We all love cards that look absolutely stunning and only take a few minutes to make. With the Watercolour Wings stamp set, this is definitely achievable. Great when you have multiple cards to make and not much time. And the Framelits make cutting it all out so much easier.

Now, I love simple. I do. But sometimes a card is just screaming out to be ‘”stepped up”! This was one of those cards. And even though I do love the card in the catalogue, I had to put my spin on it and create a Vintage Graffiti version.

I love to always try and matt my cards if I can and this one was no exception. Grabbing my new favourite colour (and we all know what this is by now, don’t we?), which also featured in my watercolour butterfly (even though layered with the yellows, it comes across as a much more vibrant green colour), I used it as the base of my card. And layered the Whisper White layer on top using Stampin’ Dimensionals. This always helps a card look a bit more detailed.

What do you think of my “stepped up” version?

I left the little stamped Pink Pirouette dots as the background as I love the delicate look they gave. These also featured in the first card. I also stepped up my card by adding some texture with our white jute ribbon and turning it into a banner and some loopy linen thread. Some basic pearls added to the body really set the butterfly off.

Once again, thank you for taking the time to look and read my blog. The next blog in the hop is Bronwyn Eastley. She had something really spectacular in store for you so quickly head on over!!!

Happy stamping,
From your favourite Vintage Graffiti artist,
Emma xo

Product List